An Ultimate Guide To Assembling A Fingerboard
Have you bought a new fingerboard for yourself? Do you know how to assemble your brand-new fingerboard? If not, nothing is worth worrying about.
Skateboarders love fingerboards since this small skateboard replica is their partner in their leisure time. Every skater has their own custom fingerboard that suits their personality. Are you planning to own one?
Your presence indicates that you are a beginner planning to tap into fingerboarding. But first, you need a fingerboard, and you have bought that; all you need to do is assemble it correctly.
So, let’s dive deep into this article and find the correct way to assemble a fingerboard without any due!
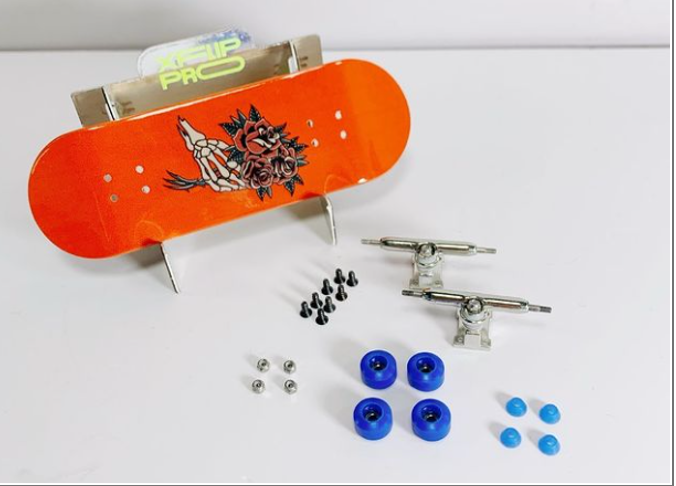
Step-by-Step Guide to Assembling a Fingerboard
Assembling a fingerboard is relatively easy; here are the steps you need to take to do that: –
Connect the Fingerboard Truck
Once you unbox your brand-new fingerboard and get everything out of the box, you must attach premium fingerboard trucks to the deck. The truck is usually not pre-threaded, and you can quickly attach it to the deck. You will find using 8 screws in the package, which you will use to connect your fingerboard truck to the deck.
Pro Tip to Properly Connect the Fingerboard Truck
Attaching the truck to the deck the first time could be difficult. Place the screws in the fingerboard truck before you connect it to the deck to simplify the task. Then, you can remove the screws and attach the truck to the deck. After connecting the truck, ensure the screws go through the fingerboard truck properly; otherwise, the truck will fall off.
Place the Wheel on the Axle
After attaching the truck to the deck, place the wheel on the axle. Ensure the wide side of the wheel faces outward. Here are the other steps you need to follow: –
- First, place the nut in the tool.
- Tighten the wheel to the axle.
- The nut must be tight but should not jam the wheel and should turn freely.
Time to Work With the Tape
Once you place the wheel on the axle, peel off the backing from the foam tape. Use fine sandpaper or a nail file to remove the excess foam tape.
Expert Tips to Choose the Right Fingerboard
Though the above information shows that you have bought a fingerboard, here are the expert tips that might help you choose if you haven’t.
- Deck material: The fingerboard is usually made of plastic and wood. You can choose as per your preference; however, you must choose wooden fingerboards for the best performance.
- Width of Deck: Since we all have fingers of different sizes, choosing a fingerboard with the correct width is essential. If you are a beginner at fingerboarding, buying a fingerboard with a 34mm wide deck is advised.
- Fingerboard Wheels: Beginners should choose a fingerboard with CNC-bearing wheels for durability and long-lasting smoothness of the wheels.
- Deck concave: Some people like a deck with a low-concave, while others go for high-concave decks. For beginners, a deck with a higher concave is recommended.
- Bottom Graphics: Apart from the functionality of the fingerboard, you might be interested in making it look unique and eye-pleasing. So, while choosing a fingerboard, ensure you buy one with beautiful graphics for yourself.
These are a few tips that might help you buy the correct fingerboard for yourself. You can also go for premium fingerboard wheels and trucks for a better riding experience.
Final Verdict
There are numerous reasons people love fingerboards, and you seem to be a fingerboard lover. You might have bought a fingerboard to enjoy fingerboard and struggling to assemble to fingerboard alone; that’s why you are here. This article contains all the vital information regarding assembling a fingerboard. Also, it has all the information on buying the right and the best fingerboard.
Hopefully, after reading this article, you can buy a fingerboard for yourself and assemble it without hassle.