How Do You Put On Clip-In Hair Extensions?
A clip-in hair extension is essentially a hair weft or group of wefts sewed or glued onto a modest seam with small, metal snap-clips connected, ready to be put into natural hair. There are several thicknesses, weights, pieces, lengths, colours, and seam material options to suit all hair types and needs. This temporary hair extension method can be applied and removed on the same day and can be reused for months, if not years, if properly cared for. For additional benefits, you can select the best yaki straight tape in hair extensions, which is perfect for you.
Section Off Hair
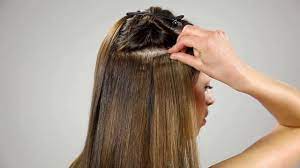
Section off your hair in a line from the middle of the ear to the middle of the skull with the back end of a rat tail comb. It is essential to keep the line as straight as possible, so an extra mirror can help. Clip the upper part of the hair to separate it from the remainder of the hair, then repeat on the other side. To keep things neat and simple, trim the sections below aside.
Use a Mid-Sized Clip-In
Hold one of the mid-sized extension pieces up to the newly produced section to determine where it should go. It should be centred and not cover the ears. Brush through the area underneath and tease at the root to help keep the extensions stable. Spray hairspray lightly on the teased area. Check that all of the extension clips are open. Then, holding the extension piece on either end, move it to the back of your head and feel around for the last section you made.
Use the largest clip-in
Hold your largest clip-in up to locate the optimal placement. It should be centred around your crown, not too close to the sides. Brush through the section, tease at the root, and mist with hairspray softly. Select the perfect yaki straight tape in hair extensions for a better experience. Spray each open clip on the extension before installing it. As before, bring the extension to the back of your head while gripping it on either end. Because this component has four clips, begin by digging in and attaching the centre two clips.
Section and prepare one side of the hair
Part of the hair on one side of the head, starting from the centre of the brow. As previously stated, a straight line with enough hair on top to cover an extension piece is desired.
Use a Small Clip-In
Hold one of the little clip-ins up to discover the optimal placement. It can be a little more challenging than the previous placements since you need to make the extension far enough back that it merges perfectly with the rest of the hair, but you also don’t want to overlap too much with the middle portions.
Let All Hair Down
Remove the clip from above and carefully brush through the top part. Make that none of the top hairs are linked to any wefts in the back. If so, make any necessary adjustments. A portable mirror is useful here to ensure that the extensions are coated. It is a moment to correct any errors before the full set-in.


