Everything You Need to Know About Learning to Play the Cello
Introduction
Congratulations on starting your cello study! At any age, learning to play a musical instrument can be an extremely satisfying, demanding, and joyful addition to your life. We'll talk about your first cello lesson and some basic instruments to get you started.
How to Play Your Cello
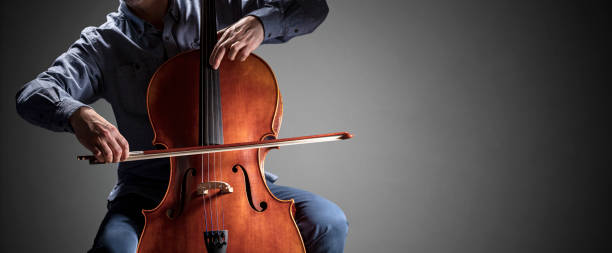
Because of the uniqueness of each person's bodies, their setup may vary slightly, but there are some fundamentals that remain constant. If you hold the cello in a different way than someone else, don't be surprised if it looks different. Practice sitting comfortably without the instrument first before picking up the cello. Look for a seat that has a slight downward slope from your upper thighs to your knees when selecting a chair that is the right height for you.
Your feet should be planted about shoulder-width apart, and you should hold you’re back straight but not stiff. Try changing positions from sitting to standing without moving your feet. Playing the cello can be done well from any position your feet are in. When you are seated, you want to make sure that you are not leaning too far forward or back.
Your seated position shouldn't change much when you pick up the cello and place it in front of you. Change the endpin to a length that empowers you to sit as easily as in the past. Although the endpin should probably be closer to your right foot than your left, we typically consider the cello to be in the middle of your body.
Due to differences in height, each person will have slightly different knee positions, but in general, your knees should meet the cello around the bottom of the "C" curves on the side of your cello. Your left knee would be further behind the cello than your right knee, which would help you if the body of the cello was also angled toward your right side. This can often make it easier to play the higher strings and upper registers of the cello.
How Much Equipment Do You Need to Start Playing the Cello?
Bring the following items with you to your first lesson:
- Rockstop
- Rosin
- Tuner
- Metronome (some metronomes include tuners built in)
- Cloth to clean
- Mute
- Added strings
How to Hold the Cello with Your Hands
In general, the basic hand position that works best is the one that is closest to how your hands naturally fall. Try this activity: Hold your hands in front of you, shake them, and then flip them over, palms facing up. Take a moment to observe how your fingers naturally curve. Now, take your arms and hold them as if you were playing the cello. The way you will use your hands to play the cello is not dissimilar to your natural hand position. Additionally, this exercise is a great way to re-acquaint yourself with the importance of holding your hands relaxed when playing any instrument.
Both you’re left-hand and right-hand playing is just as important to your cello study as the other. If we were to think of playing a phrase as speaking a sentence, your left hand would be in charge of choosing the words and your right hand would be in charge of saying them; the sentence's volume, force, and cadence. To put it another way, the content of your expression is dictated by your left hand, while the manner in which it is expressed is determined by your right hand.
When playing, the general rule of thumb is for both arms to be pointing in a gentle downward direction from your shoulders to your hands. Like a ski hill when you play, your arms and back muscles will generate a significant amount of your power; this is easiest to do if your wrists and elbows are straight and you keep your arms in a downward slope. Consider your elbows as a support system; avoid the habit of either keeping your elbows too loose and allowing them to flop down or holding tension in them.
Advice for Cellists' Left Hand
When learning to play a musical instrument, there are a lot of different approaches, variations, and combinations that can be used with both hands; In this instance, we will talk about general steps to take to start playing the cello.
While your fingers will be on the strings, your left thumb also helps you navigate the fingerboard and maintain your hand's balance. A good place for your thumb to be is just behind where your middle (or second) finger is on the string. When playing in lower positions, your thumb should always be in contact with the neck, but not so much that you are pressing it into the back of the neck or squeezing your hand.
Your left hand ought to be shaped similarly to the downward slope shape we discussed for arm position: Your hand should form a soft "C" shape with the knuckles at the base of your fingers remaining above your finger knuckles and fingertips. Between your very tips and the center, or pad, of your fingers, is a good place for your fingers to make contact with the strings. As you get better at playing the cello, you can change where your fingers are based on the music. This should help you a lot as you start your studies.
How to Get the Cello to Do Vibrato
Like many of the other topics covered in this article, vibration is a complex subject, but there are some general rules that will help you get started. I typically picture vibrato as an elbow hinge movement, but the movement is so minute that only the tip of your finger moves. Beginning with a smooth, "rolling" vibrato will allow you to progress to developing varying speeds and widths of vibrato as you study the cello.
Tips for Bowing for Cellists
One of your primary means of expression is your right hand. The following are some of the primary influences on the sound production: the speed at which you draw the bow, the position of the bow between the bridge and the fingerboard, and the weight of your arm and the amount of weight you put on the bow. When it comes to putting those three elements into practice, there is no one "right" way to do it; rather, it will constantly shift depending on the music and your preferences. Feel free to try out a variety of sounds by experimenting!
Conclusion
Another technique with more nuance than first appears is performing pizzicato on the cello. The tone and volume of the sound, for instance, will be affected by where you pluck the string higher or lower on the fingerboard. Feel free to play around with it. Thinking of the pizzicato motion as being directed to the side rather than drawing the string upward might be of assistance to you. You can also try prizing with a variety of fingers, usually your first or second finger.